Showing posts with label Link Party. Show all posts

11 November 2010

You Can Linky to Flickr


I was experimenting with Linky. I found out that you can add a link to your Flickr photo.


I will show you how I added my Hexie Caddy photo from Flick to my Hexie Caddy parade in my blog.


1. First, choose the photo .


address bar

2. See the address I circled at the address bar? Right click to ‘Copy’.


3. Go to the bottom of the Hexie Caddy Tutorial post.


image


4. Click on the “Click here to enter’.


image


5. Right click in the ‘Link it to’ box, and paste the address you copied in step #2.

6. Add your caption or title.


image

7. Click on ‘ From Web’.


image image

8. Select your image, crop , click ‘Ok’ and you should be able to see your thumbnail in my Hexie Caddy Parade !


image


So if you do not have a blog, but you have Flickr and have  made a Hexie Caddy Pincushion, join in the  Parade!

30 July 2010

Stitching Folder

Lately, I’ve been spending a lot of time stitching BOMs and pretty stitcheries.
Then I realise, I need something to carry all the stuffs when I am on the go. So, I came up with a folder!

DSCN2297
There’s a pocket to keep the floss….and buttons to ‘hang’ the separated floss……
( I usually use two strands on all my stitcheries)


DSCN2298
….another pocket to keep the scissors ….and some sort of ' ‘skirting’ that opens up like a tray. The ‘skirt’ prevents the scissors and fabric from slipping out.


DSCN2299 DSCN2296

DSCN2294    
I used the Roses stitchery by Jenny of Elefantz. Thanks Jenny.
(A little confession…I was too lazy to print out the pattern, so I just copied it of the computer screen.)


Penny joined these parties


30 June 2010

Tote Upgrade

quilted triangles tote Remember this bag? As much as I love the hand quilted triangles….


DSCN2241 ….I didn’t use much of this bag because it doesn’t have a closure. I thought I need to add a magnetic button but I didn’t want to open up the lining to ‘plant’ the button. So……
  DSCN2229  I gathered a set of magnetic button, two pieces of fabric and two pieces of stiff iron-on interfacing cut in circles…

DSCN2231 …center the interfacing on the wrong side of the fabric and iron the interfacing in place.


DSCN2233
On the right side, center the washer and mark the slits.


DSCN2236
Using the seam ripper, cut the slits just long enough for the feet to go through.


DSCN2237
Push through the feet,place in the washer and press down the feet to secure.

DSCN2238
DSCN2239
Using running stitches, stitch close to the edge and pull the stitches tight .Just like making a yo-yo.Secure the stitches with a knot.

DSCN2240     The one on the left is done.


DSCN2242
DSCN2243
Position the buttons and ‘applique’ in place. I used small stitches. I’m going to be tugging those circles each time I open my bag !


DSCN2244
DSCN2246
Done ! Good thing I kept those scraps. It’s almost ‘invisible”.


DSCN2245
DSCN2247
Now I can secure the content of my bag from preying eyes !


Update: Penny joined these parties


image
image

16 June 2010

Tea Party No 12

image


It’s party time again. Of course I am talking about  Sachiko’s Tea Rose Home Link Party. It’s been running for the twelfth week now..and going stronger each week! There are heaps of  creative people out there!

This week I am sharing one of the bags I made for mum. Go check out my bag! It’s entry number nine! …and don’t forget to say ‘hi’ to everyone at the party!
                                           wink    See you there!

31 May 2010

Oven Toaster Cover For My Sister

image Remember this ? Made it into …….


DSCN2165

....this for my sister.Smile
It’s an oven toaster cover. Used a box to test it out,so it didn’t fit properly but I sure hope it fits the real one !


Let me show you how I made it.


toaster cover layout

First, choose your fabric and cut out the pieces as above.
Cut out another set for the lining.
The 2cm I added is the seam allowance.


TOASTER COVER FIG2
On the wrong side of the fabric, draw two lines.
Then draw a circle( I followed the diameter of my stitchery).
I position it in the center of the front panel.


DSCN2144

I hope I’m making some sense so far!Wink


DSCN2145DSCN2146

Place a white fabric, right sides together where the circle is. (Remember, the circle is drawn on the wrong side.) Pin the fabric in place and stitch the circle. I stitched 0.5cm away from the circle I drew.

DSCN2149DSCN2148
Cut out the circle, following the pencil line.Cut notches.


DSCN2152DSCN2153
Turn over the white fabric to the back and baste the edges.
I let the white fabric show a little.

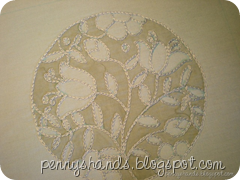
      stitchery in window
Place the cut out frame over the stitchery and ta-da… a framed stitchery!
Remember to stitch around the the frame.
Trim the stitchery piece so as not to have too much bulk.
(Sorry, didn’t take a photo of that step.)
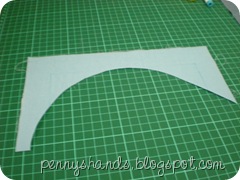

DSCN2155DSCN2157
Using the scrap from the trimmed stitchery, I cut two flowers and placed it on the side panel pieces. Then using the water erasable fabric pen, I drew the petals and stem.
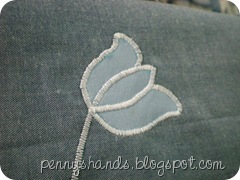

DSCN2164
Machine appliqued the flower using satin stich.

joining toaster 
(Darn…forgot to take the photo again. I hope this picture helps.)
Before joining the panel pieces, I baste the lining to the main fabric pieces.
(If you are using thicker fabric, you may not need a lining.)
Using the picture as a guide, cut notches (0.8cm) (for easier pivoting when you reach the corner) and join the side panel to the main body.
Trim and finish the seams.(I used zig zag.)

         DSCN2166
DSCN2165
That’s the applique flower on the side panel.
Oh yes, I finished the raw bottom edges with striped fabric.

You better like this, sis!Wink
And it better fits your toaster!


Update: Penny joined this party

image